Tomorrow is National Pizza Party Day to celebrate the 3 billion pizzas American’s consume every year! Some people like it Chicago style, others think New York makes the quintessential pizza. Thick crust! Thin crust! Cheese stuffed crust! Gluten-free…? Don’t even go there! But, no matter how you slice it, I think everyone agrees that cheese is a critical ingredient!
Maybe you’ll be lazy and have your next pie delivered. (You better not pick up one of those frozen numbers from the store!) But if you’re feeling inspired and ambitious, why not make your own homemade mozzarella, or invite your foodie friends over and open a few bottles of wine for a cheesemaking party?! We’ve got the step-by-step ‘How To’ from professional cheesemaker Jeanine Dargis beautifully illustrated by our friends at Fix.com. Click the link to read the full article Mozzarella Made Easy.
How To Make Homemade Mozzarella Cheese
By Jeanine Dargis
Making mozzarella at home is easy and fun. It is very important, however, to choose the right kind of milk. Use the highest-quality milk you can find, gently pasteurized, and preferably non-homogenized. Most milk found at supermarkets in the U.S. is ultrapasteurized, which means that the milk has been heated to temperatures as high as 280°F in order to kill any harmful bacteria. This harsh process adversely affects the molecular structure of the milk, making it more likely that the curd won’t stretch or will have an unpalatable texture. If your curd doesn’t work and you did everything right, it might be a milk issue. Try another brand of milk!
Cheesemaker’s Note
This recipe uses citric acid, which immediately acidifies the milk. Other recipes use lactic acid bacteria, which takes more time, but I’ve found this mozzarella to be delicious and indistinguishable from the “traditional” method. Before beginning there are a few items that need to be bought, I buy my cheesemaking supplies through Amazon.com or Cheesemaking.com.
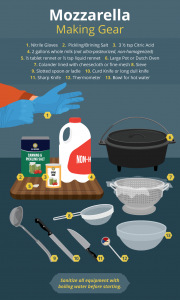
Things You’ll Need:
Sanitize All Equipment With Boiling Water Before Starting Your Homemade Mozzarella
- 2 gallons of good-quality whole milk (NOT ultra-pasteurized and non-homogenized if you can find it)
- 3 ½ tsp Citric Acid
- ½ tablet rennet OR ½ tsp liquid rennet
- Large Pot or Dutch Oven
- Colander lined with cheesecloth or fine-mesh sieve
- Bowl for hot water
- Slotted spoon or ladle
- Thermometer
- Curd Knife or long dull knife
- Sharp Knife
- Pickling/Brining Salt
- Nitrile Gloves
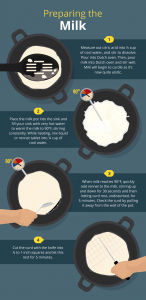
Measure out citric acid into a ½ cup of cool water, and stir to dissolve. Pour into Dutch oven. Then, pour milk into Dutch oven over the citric acid and stir well. Milk will begin to curdle as it’s now quite acidic.
Place the milk pot into the sink and fill your sink with very hot water to warm the milk to 90°F, stirring constantly. You could also heat over low heat on a stovetop, stirring constantly. While heating, mix liquid or rennet tablet into ¼ cup of cool water.
When milk reaches 90°F, quickly add rennet to the milk, stirring up and down for 30 seconds and then letting curd rest, undisturbed, for 5 minutes. After 5 minutes, check the curd by pulling it away from the wall of the pot, or check for “clean break” with a knife.
Cut the curd with the knife into ½ to 1-inch squares and let this rest for 5 minutes.
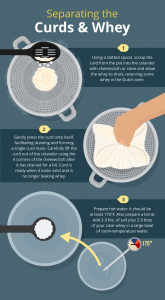
Prepare the cheesecloth and colander or sieve over a sink or pot. I used both here for faster draining.
Using a slotted spoon, scoop the curd from the pot into the colander with cheesecloth or sieve and allow the whey to drain, reserving some whey in the Dutch oven. You can also scoop both curd and whey into the colander with a bigger cup, but draining will take longer.
Gently press the curd onto itself, facilitating draining and forming a single curd mass. If using cheesecloth, you can carefully lift the curd out of the colander using the 4 corners of the cheesecloth after it has drained for a while. Curd is ready when it looks solid and is no longer leaking whey.
As the curd drains, prepare hot water: it should be at least 175°F. Also prepare a brine: Add 2-3 tbs. of salt plus 2-3 tbsp of your clear whey to a large bowl of room-temperature water.
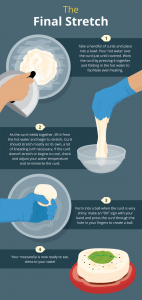
Wearing gloves, cut or break the curd into 1-2 inch pieces. Take a handful of curds and place into a bowl – pour hot water or whey over the curd just to cover it. Work the curd by pressing it together and folding in the hot water (with your gloved hands OR with a spoon) to facilitate even heating. As the curd begins to meld together, lift it from the hot water and begin to stretch.
Curd should stretch mostly on its own – a lot of kneading isn’t necessary. If the curd does not stretch, check and adjust your water temperature and re-immerse the curd. If there continues to be stretching issues, it might be a milk problem.
If curd begins to cool too much, or if it begins to tear, place it back in the hot water to reheat. Add more hot water if necessary. Form into a ball when the curd is very shiny – make an “OK” sign with your hand and press the curd through the hole in your fingers to create a ball.
At this point your homemade mozzarella is finished! Place in brine and let sit for 20-40 minutes, then refrigerate or enjoy right away!
Article courtesy of Fix.com



Leave a Reply