Ahhh… summer vacation! Back in my day we rode the bus to the beach everyday carrying a boombox & a backpack that held Coppertone, gummy bears, Gatorade and a paperback book! Today’s kids don’t have that luxury, so they are easily bored! The first few weeks of June, it’s all fun and games (the kind on screens, of course!), but after a week of camp and a few outings with friends to play mini-golf & go to the arcade, they’re complaining there’s nothing to do! Am I right?! That’s why we’ve dedicated the month of July to kids and family! We’re kicking it off with activities & crafts for kids to make days at home a little more exciting! (Next week we’re gonna show you how to party in the yard kids style. Can’t wait to get the party started?! Then, check out our Super Secret Party Tips in the meantime!)
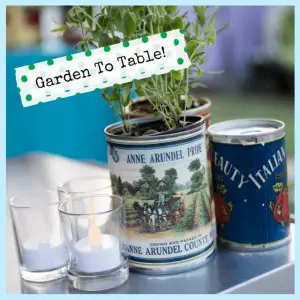
Coffee Can Planters
If there’s one thing we can all agree on is that kids love making things and playing in the dirt! Working in the garden gives kids the best of both worlds AND it spruces up the yard! Plus, if you plant edible plants, like herbs and vegetables, you get the added bonus of food you don’t have to buy at the grocery store! This is called #earnyourkeep Ha! You don’t have to buy anything in the way of pots or containers for this activity because this idea uses coffee cans (or any other kind of cans for that matter!).
If you haven’t collected enough cans, ask the neighbors if you can rummage through their recycle bin for some. To decorate, you can use the can’s own label (some, like these pictured, have really cute artwork!) or you can create your own design on paper, cut to size and glue on. Alternately, decorative duct tape is an easy way to add color. Or, if you have craft paint or Krylon, you can paint the cans different colors as an option. Then all you need is potting soil and seeds or plants! Remember to poke a few holes at the bottom of the can so your plants can drain! Attach pots to a post to create a little garden sculpture, hang the pots on a fence with hooks, or simply put them on a ledge.
DIY Tinkerbox
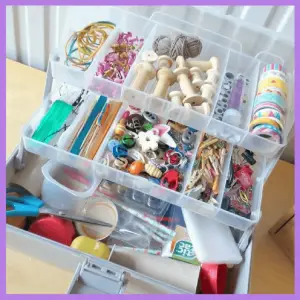
I love this tinkerbox found on Pinterest! One: it keeps things neatly organized so there isn’t some big jumble of stuff in a box that you have to dig through. Two: it keeps everything contained so there aren’t little sharp pieces of something lying around that will get sucked up by the vacuum or stepped on! This is something your kids will be able to utilize year round anytime you hear the words, “I’m bored!” #GoMakeSomething
Include household items and craft supplies from the store. The whole idea is to inspire creativity and imagination, so there’s really no limit to what you can put inside your tinkerbox: thread spools, washi tape, paper clips, pipe cleaners, sequins, tree pods, candy containers, mint tins, twine, & glue and scissors, of course! Colorful washi tape around some recycled yogurt containers and you’ve got yourself some new desk supplies!
Orange Peel Bird Feeders
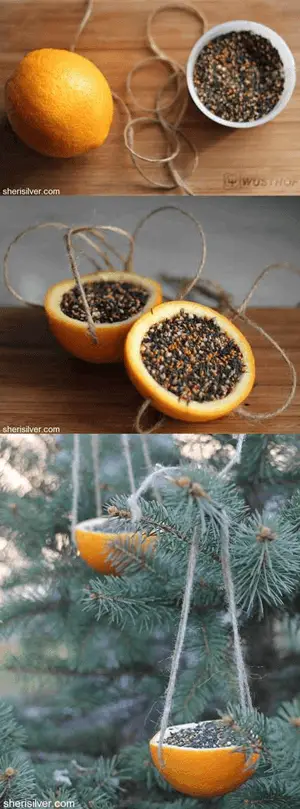
This is another fun craft that’s easy even for the little kids. All you need are some oranges, twine, and birdseed. If you want to make it last longer, you’ll also need wax. Simply cut an orange in half and scoop the flesh of the fruit out. Tip: Eat the fruit! I mean, duh, why let it go to waste?! Okay, rant over. Next step. Dip the orange half in a thin layer of melted wax. This will help preserve the skin of the fruit so it will last longer. If left in its natural state, moisture, heat, and insects will cause the orange to deteriorate faster (plus, some birds might not like the smell of the orange). It all depends on how long you want your fruit feeder to last. If you’re going to need another activity for your kids to do next week, maybe leave it natural and let it fall apart so your kid will have to make another! Use a skewer or paperclip to poke a hole on two sides of the orange and then knot some twine to secure it on each side, leaving enough twine to hang from a tree branch or fence. Fill with birdseed and wait for birds to show up for dinner!
Homemade Flubber
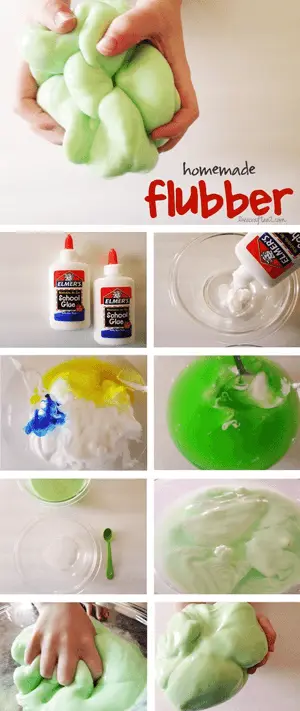
First it was slime, now it’s Flubber, a kind of squishy, rubbery pile of goo that’s fun to squeeze in your hand, mold into shapes, and play catch with. You’ll need glue, borax and some food coloring to make it look nice. You can find the recipe on Pinterest.
Potato Chia Head
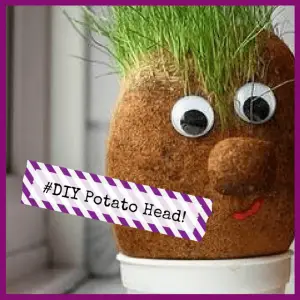
This Mr. Potato Head is not made of plastic like the ones we used to play with and it’s not even made from a potato! But it looks like one, so that’s what it’s called! This simple craft falls under the definition of life’s simple pleasures because it’s really fun for kids (and parents!) to watch the “hair” grow! You can find different examples on Pinterest, but here’s what you’ll need to make your own: pantyhose, grass seed, potting soil, googlie eyes and a glue gun to apply them with, and a small container that can be recycled from anything – yogurt container, sour cream container, lid of an aerosol can, whatever. You just need something that’s not too deep that will hold a little water.
2-Liter Terrarium
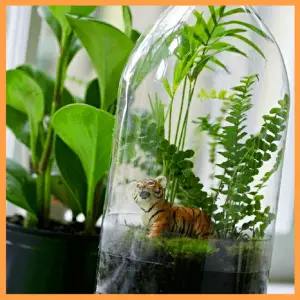
This is pretty self explanatory! After your kids finish off the soda (or you just dump it down the drain ‘cuz sugar + kids = no no), remove the label and use an exacto knife (parents, this part is for you) to cut off the top third of the bottle, leaving about an inch and a half attached so you can tilt the top back and let your kids fill with soil, plants and statuary! (The one pictured is cut in half in the middle, but I don’t like the look of having a seam in the center. Maybe, you do. Either way is fine!) I like putting ribbon or decorative washi tape around the seam where it’s cut once the terrarium is full. The opening at the top is sufficient for watering to keep your plant moist.
Baking Soda Rainbows
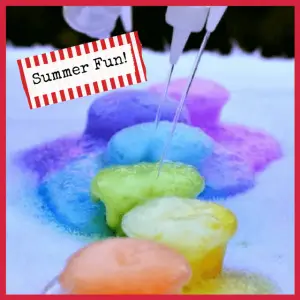
This activity is part science project, part craft! Baking soda, vinegar, food coloring and some containers are all you need. It’s easiest to color the baking soda using ziploc sandwich bags. Fill the bags about half full and add a few drops of food color. Shake until the baking soda is dyed to the desired color, then put the different colored baking soda into small cups. Drip vinegar on top and VOILA! A rainbow eruption any unicorn would be proud of!
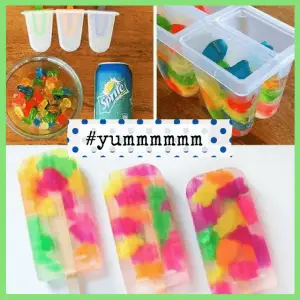
Gummy Bear Popsicles
Is there anything better than a craft you can eat?! The answer is: NO! You’ll need popsicle molds, gummy bears & a beverage. This version from pinterest uses Sprite, but you can also use lemonade or punch. Fill the popsicle slots with gummies, add liquid, put in freezer! That’s it! (Unless you count the freezing time.) While the popsicles are chilling, get your kids started on another craft to pass the time until your frozen flavored fun is ready!
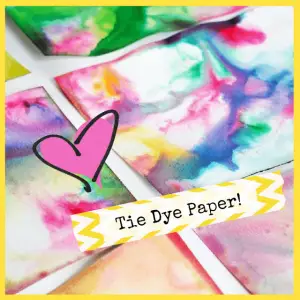
Tie Dye Paper
I love these marbled milk papers! Frame them or use them as wrapping paper for gifts. You’ll need a rectangular pyrex dish big enough to hold a sheet of paper. For the paper, don’t use printer paper, it’s too thin. Get actual watercolor paper from the arts and crafts store (the kind artists paint on). Pour a thin layer of milk in the dish (regular milk or almond milk works). Add a few different drops of food coloring. Then, dip a Q-tip into dish soap. Follow this step, by dipping the Q-tip into the food coloring drops in the milk. This will cause the coloring to spread in beautiful patterns across the milk! Once that it done, swirl the colors to create a marbling effect and then dip your paper in the liquid and let dry.
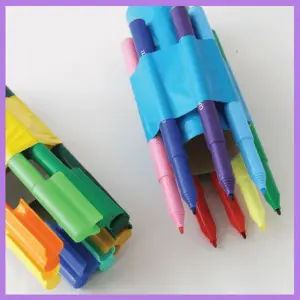
Toilet Paper Roll Marker Art
The idea of this is to have different colored markers (or colored pencils) contained in a bundle so that when you draw on the paper, it creates a symmetrical swirling effect. Shove as many different colored markers or pencils into an empty toilet paper roller as it will hold. Then grip the bundle and create your masterpiece!
Next week we’ll be sharing party tips for backyard entertaining (yes, more glamping and movies under the stars!) with your kids! Until then, check out our Super Secret Party Tips Guide – it’s FREE!
If you liked this week’s article, take a peek at these…
Great Ways To Include Kids On Your Big Day!
Create A Personalized Family Fun Day!
Throw An Awesome Kids Party And Not Spend A Ton!
What unique crafts have your kids come up with? Let us know in the comments below!


Leave a Reply